Django for Beginners: A Complete Guide to Building Your First Web App
Django is one of the most popular frameworks for building web applications in Python. If you're a beginner interested in creating your first web app, Django offers a powerful and easy-to-use framework that will get you up and running in no time. In this comprehensive guide, we’ll take you through everything you need to know to build your first Django web app from scratch.
Whether you’re new to Django, Python, or web development in general, this tutorial will guide you through the basics while highlighting essential tools and techniques. We'll also cover key concepts like Django ORM, Django admin, Django REST framework (DRF), and integration with Docker, PostgreSQL, and more.
What is Django?
Django is a high-level Python web framework that encourages rapid development and clean, pragmatic design. It was created to make web development more manageable and scalable, allowing developers to focus on writing their apps rather than reinventing the wheel. With Django, you get several built-in features, like user authentication, admin panels, and an ORM (Object-Relational Mapping) system, making it easier to create complex web applications.
Why Use Django?
Here are some of the reasons Django is a great choice for beginners:
- Fast development: Django handles much of the backend tasks, so you can focus on writing your application.
- Scalability: Django scales well as your project grows.
- Secure: Built-in security features help protect your app from common threats.
- Versatile: It can be used for all types of web applications, including APIs and full-stack websites.
Setting Up Your Django Project
Before building your web app, you’ll need to set up your development environment. Follow these steps to get started:
Create a new directory for your project. This is where your project will be. Open command line
mkdir django-project
cd django-project
Create virtual environment python
Once you’re inside the django-project/ directory, it’s a good idea to create a virtual environment to manage dependencies. The following command is use to create a virtual environment all operating system i.e Windows, Linux + macOS
python -m venv venv
This command will create a venv folder in your working directory. Inside this directory, you’ll find several files, including a copy of the Python standard library. Later, when you install new dependencies, they’ll also live in this directory. Next, you need to activate the virtual environment by running the following command:
Activate virtual environment
- Windows:
venv\Scripts\activate - Linux + macOS:
source venv/bin/activate
With the above commands, you create and activate a virtual environment named venv by using Python’s built-in venv module. The parenthetical (venv) in front of the prompt indicates that you’ve successfully activated the virtual environment.
 |
| created and activated a virtual environment |
Now that you’ve created and activated a virtual environment, it’s time to install Django. You can do this using pip:
1. Install Django
Django is built in Python, so you'll first need to install Python. If you haven’t installed Python yet, download it from the official Python website. After installing Python, you can install Django via pip:
pip install django
2. How To Create Django Project
Once Django is installed, create a new Django project by running the following command with a fullstop at the end to avoid duplicating project folder:
django-admin startproject myfirstproject .
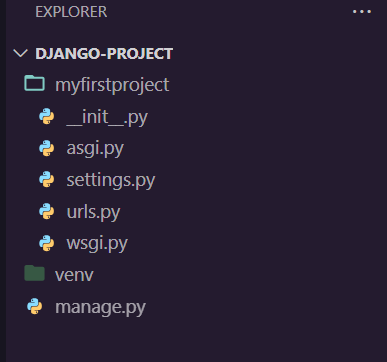
This will create a new folder with your project files. Your file structure should look like this:
3. Run the Development Server
To see your new project in action, run the development server:
python manage.py runserver
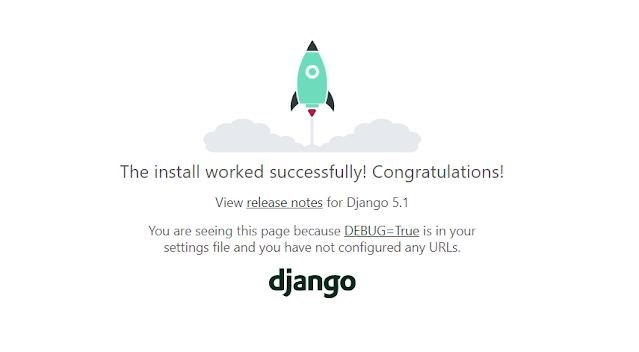
Now, open your web browser and go to http://127.0.0.1:8000/. You should see the Django welcome page!
Building Your First Django Web App
Now that your project is set up, let’s build a simple blog application to introduce you to the core concepts of Django.
1. Create a New App
In Django, a project can contain multiple apps. Let’s create our first app, “blog”:
python manage.py startapp blog
2. Define Your Models
Django models define the structure of your database. Let’s create a Post model for our blog:
blog/models.py
from django.db import models
class Post(models.Model):
title = models.CharField(max_length=200)
content = models.TextField()
created_at = models.DateTimeField(auto_now_add=True)
3. Create and Run Migrations
After defining your models, you need to create migrations and apply them to the database:
python manage.py makemigrationspython manage.py migrate
4. Register Models in the Admin Interface
Django provides a powerful admin interface. To manage your posts via the admin panel, register the Post model:
blog/admin.py
from django.contrib import admin
from .models import Post
admin.site.register(Post)
Now, create a superuser to access the admin panel:
python manage.py createsuperuser
After creating your superuser, log into the admin panel by visiting http://127.0.0.1:8000/admin/.
5. Create Views and Templates
Let’s create a view to display our blog posts:
blog/views.py
from django.shortcuts import render
from .models import Post
def blog_home(request):
posts = Post.objects.all()
return render(request, 'blog/home.html', {'posts': posts})
Next, create a simple HTML template to display the posts:
inside your blog, create a templates folder. inside the template folder create a folder the name blog. inside the blog folder, create home.html
<!-- blog/templates/blog/home.html -->
<!DOCTYPE html>
<html>
<head>
<title>My Blog</title>
</head>
<body>
<h1>Blog Posts</h1>
{% for post in posts %}
<h2>{{ post.title }}</h2>
<p>{{ post.content }}</p>
<hr>
{% endfor %}
</body>
</html>
6. Set Up URL Routing
Now, map your view to a URL. Add the following code to blog/urls.py:
blog/urls.py
from django.urls import path
from . import views
urlpatterns = [
path('', views.blog_home, name='blog-home'),
]
And include this in your project’s main urls.py file:
# myfirstproject/urls.py
from django.contrib import admin
from django.urls import path, include
urlpatterns = [
path('admin/', admin.site.urls),
path('', include('blog.urls')),
]
You should now be able to visit http://127.0.0.1:8000/ and see your blog posts displayed.
Django REST Framework: Creating an API
If you plan to build APIs, Django REST Framework (DRF) is an essential tool. It simplifies building RESTful APIs using Django. To install DRF:
pip install djangorestframework
Add 'rest_framework' to your INSTALLED_APPS in settings.py:
INSTALLED_APPS = [    'rest_framework',
    # other apps
]
Here’s a simple example of how to create an API for your Post model:
# blog/serializers.py
from rest_framework import serializers
from .models import Post
class PostSerializer(serializers.ModelSerializer):
class Meta:
model = Post
fields = '__all__'
# blog/views.py
from rest_framework.response import Response
from rest_framework.decorators import api_view
from .models import Post
from .serializers import PostSerializer
@api_view(['GET'])
def api_post_list(request):
posts = Post.objects.all()
serializer = PostSerializer(posts, many=True)
return Response(serializer.data)
Finally, update your urls.py to include the API route:
# blog/urls.py
from django.urls import path
from . import views
urlpatterns = [
path('', views.blog_home, name='blog-home'),
path('api/posts/', views.api_post_list, name='api-post-list'),
]
Conclusion
Congratulations! You’ve built your first Django web app from scratch. From creating a basic blog to understanding Django REST framework, this complete guide introduced you to key features like Django ORM, models, admin interface, and API development.
Django for beginners can be a smooth ride if you follow the right steps, and this tutorial aimed to make your journey as beginner-friendly as possible.
Frequently Asked Queries:
- What is Django? Django is a high-level Python framework used for rapid web development.
- How do I create a superuser in Django?
Use the
python manage.py createsuperusercommand. - What is Django REST framework? It's a toolkit for building Web APIs in Django.


Post a Comment