
AWS SQS Tutorial for Java Developers
If you're a Java developer looking to build scalable, decoupled applications, Amazon Web Services (AWS) Simple Queue Service (SQS) is a tool you’ll want to master. But let’s be honest—getting started with AWS SQS can feel overwhelming, especially if you're new to cloud services or messaging systems. You might be wondering:
How does SQS work, and why should I use it?
What’s the best way to integrate SQS with my Java application?
Are there any common pitfalls I should avoid?
Don’t worry—I’ve been there too. When I first started working with SQS, I spent hours sifting through documentation and experimenting with code. That’s why I’ve put together this AWS SQS tutorial for Java developers. By the end of this guide, you’ll have a solid understanding of how to use SQS in your Java projects, along with practical examples and tips to make your life easier.
If you’re new to Java or want to sharpen your skills, check out this: The Best Online Java Courses for Beginners
What is AWS SQS, and Why Should You Care?
AWS SQS (Simple Queue Service) is a fully managed message queuing service that enables you to decouple and scale microservices, distributed systems, and serverless applications. Think of it as a post office for your application’s messages. Instead of sending messages directly from one service to another, you can use SQS as a middleman to store and deliver them reliably.
Here’s why SQS is a game-changer:
Decoupling: Services don’t need to be available at the same time to communicate.
Scalability: SQS can handle millions of messages per second, making it perfect for high-traffic applications.
Reliability: Messages are stored redundantly across multiple servers, ensuring they’re not lost.
Cost-Effective: You only pay for what you use, with no upfront costs.
Whether you’re building a notification system, processing background jobs, or orchestrating microservices, SQS can simplify your architecture.
Setting Up AWS SQS
Before diving into the Java code, you’ll need to set up an SQS queue in your AWS account. Here’s how:
Log in to the AWS Management Console: If you don’t have an account, sign up for one.
Navigate to SQS: Search for “SQS” in the services menu.
Create a Queue: Click “Create Queue,” choose a name (e.g., MyJavaQueue), and select the queue type (Standard or FIFO). For most use cases, a Standard queue is sufficient.
Configure Settings: Adjust settings like message retention, delivery delay, and visibility timeout based on your needs.
Once your queue is ready, you’ll receive a Queue URL, which you’ll use in your Java application to interact with the queue.
Integrating AWS SQS with Java
Now that your queue is set up, let’s dive into the fun part—writing Java code to send and receive messages. AWS provides an SDK for Java that makes it easy to work with SQS.
Prerequisites
Before you start coding, make sure you have:
Java Development Kit (JDK): Version 8 or higher.
AWS SDK for Java: Add the dependency to your pom.xml if you’re using Maven:
AWS Credentials: Set up your credentials using the AWS CLI or by creating an ~/.aws/credentials file.
Sending Messages to SQS
Let’s start by sending a message to your queue. Here’s a simple example:
This code creates an SQS client, defines the queue URL, and sends a message to the queue. Simple, right?
Receiving Messages from SQS
Next, let’s retrieve messages from the queue:
This code retrieves up to 5 messages from the queue and prints their contents.
Common Challenges and How to Overcome Them
While SQS is powerful, it’s not without its quirks. Here are some common challenges Java developers face and how to tackle them:
Message Duplication: In Standard queues, messages can be delivered more than once. Use FIFO queues if you need strict ordering and deduplication.
Visibility Timeout: If a message isn’t processed within the visibility timeout, it becomes visible again. Adjust this setting based on your processing time.
Error Handling: Always implement retry logic and dead-letter queues to handle failed messages gracefully.
If you’re new to APX Java, check out these resources: APX Java Tutorial
Real-World Example: Building a Notification System
Let’s say you’re building a notification system for an e-commerce app. Here’s how SQS can help:
Order Placed: When a customer places an order, send a message to SQS.
Notification Service: A separate service retrieves the message and sends an email confirmation.
Scalability: During peak shopping seasons, SQS ensures no messages are lost, even if the notification service is overwhelmed.
This decoupled architecture makes your system more resilient and easier to maintain.
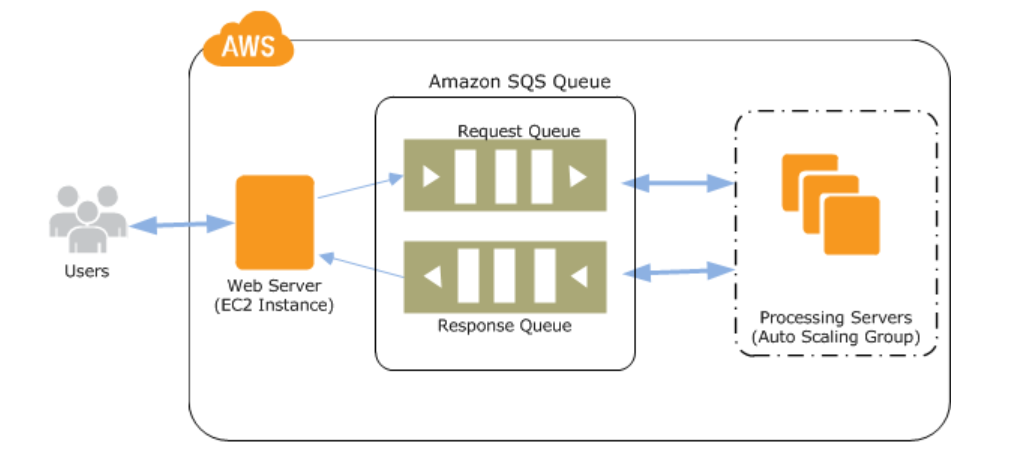
Visualizing the Process
To help you better understand how SQS works, here’s a simple diagram:
Alt text: Diagram showing how messages flow from a producer to an SQS queue and then to a consumer.
Level Up Your Java Skills
If you’re new to Java or want to sharpen your skills, check out these resources:
Wrapping Up
AWS SQS is a powerful tool for building scalable, decoupled applications, and integrating it with Java is easier than you might think. By following this tutorial, you’ve learned how to set up an SQS queue, send and receive messages, and overcome common challenges.
Now it’s your turn! Try implementing SQS in your next project, and let me know how it goes. Have questions or tips to share? Drop a comment below or share this post with your fellow developers.
Happy coding!
Post a Comment